Blog Layout

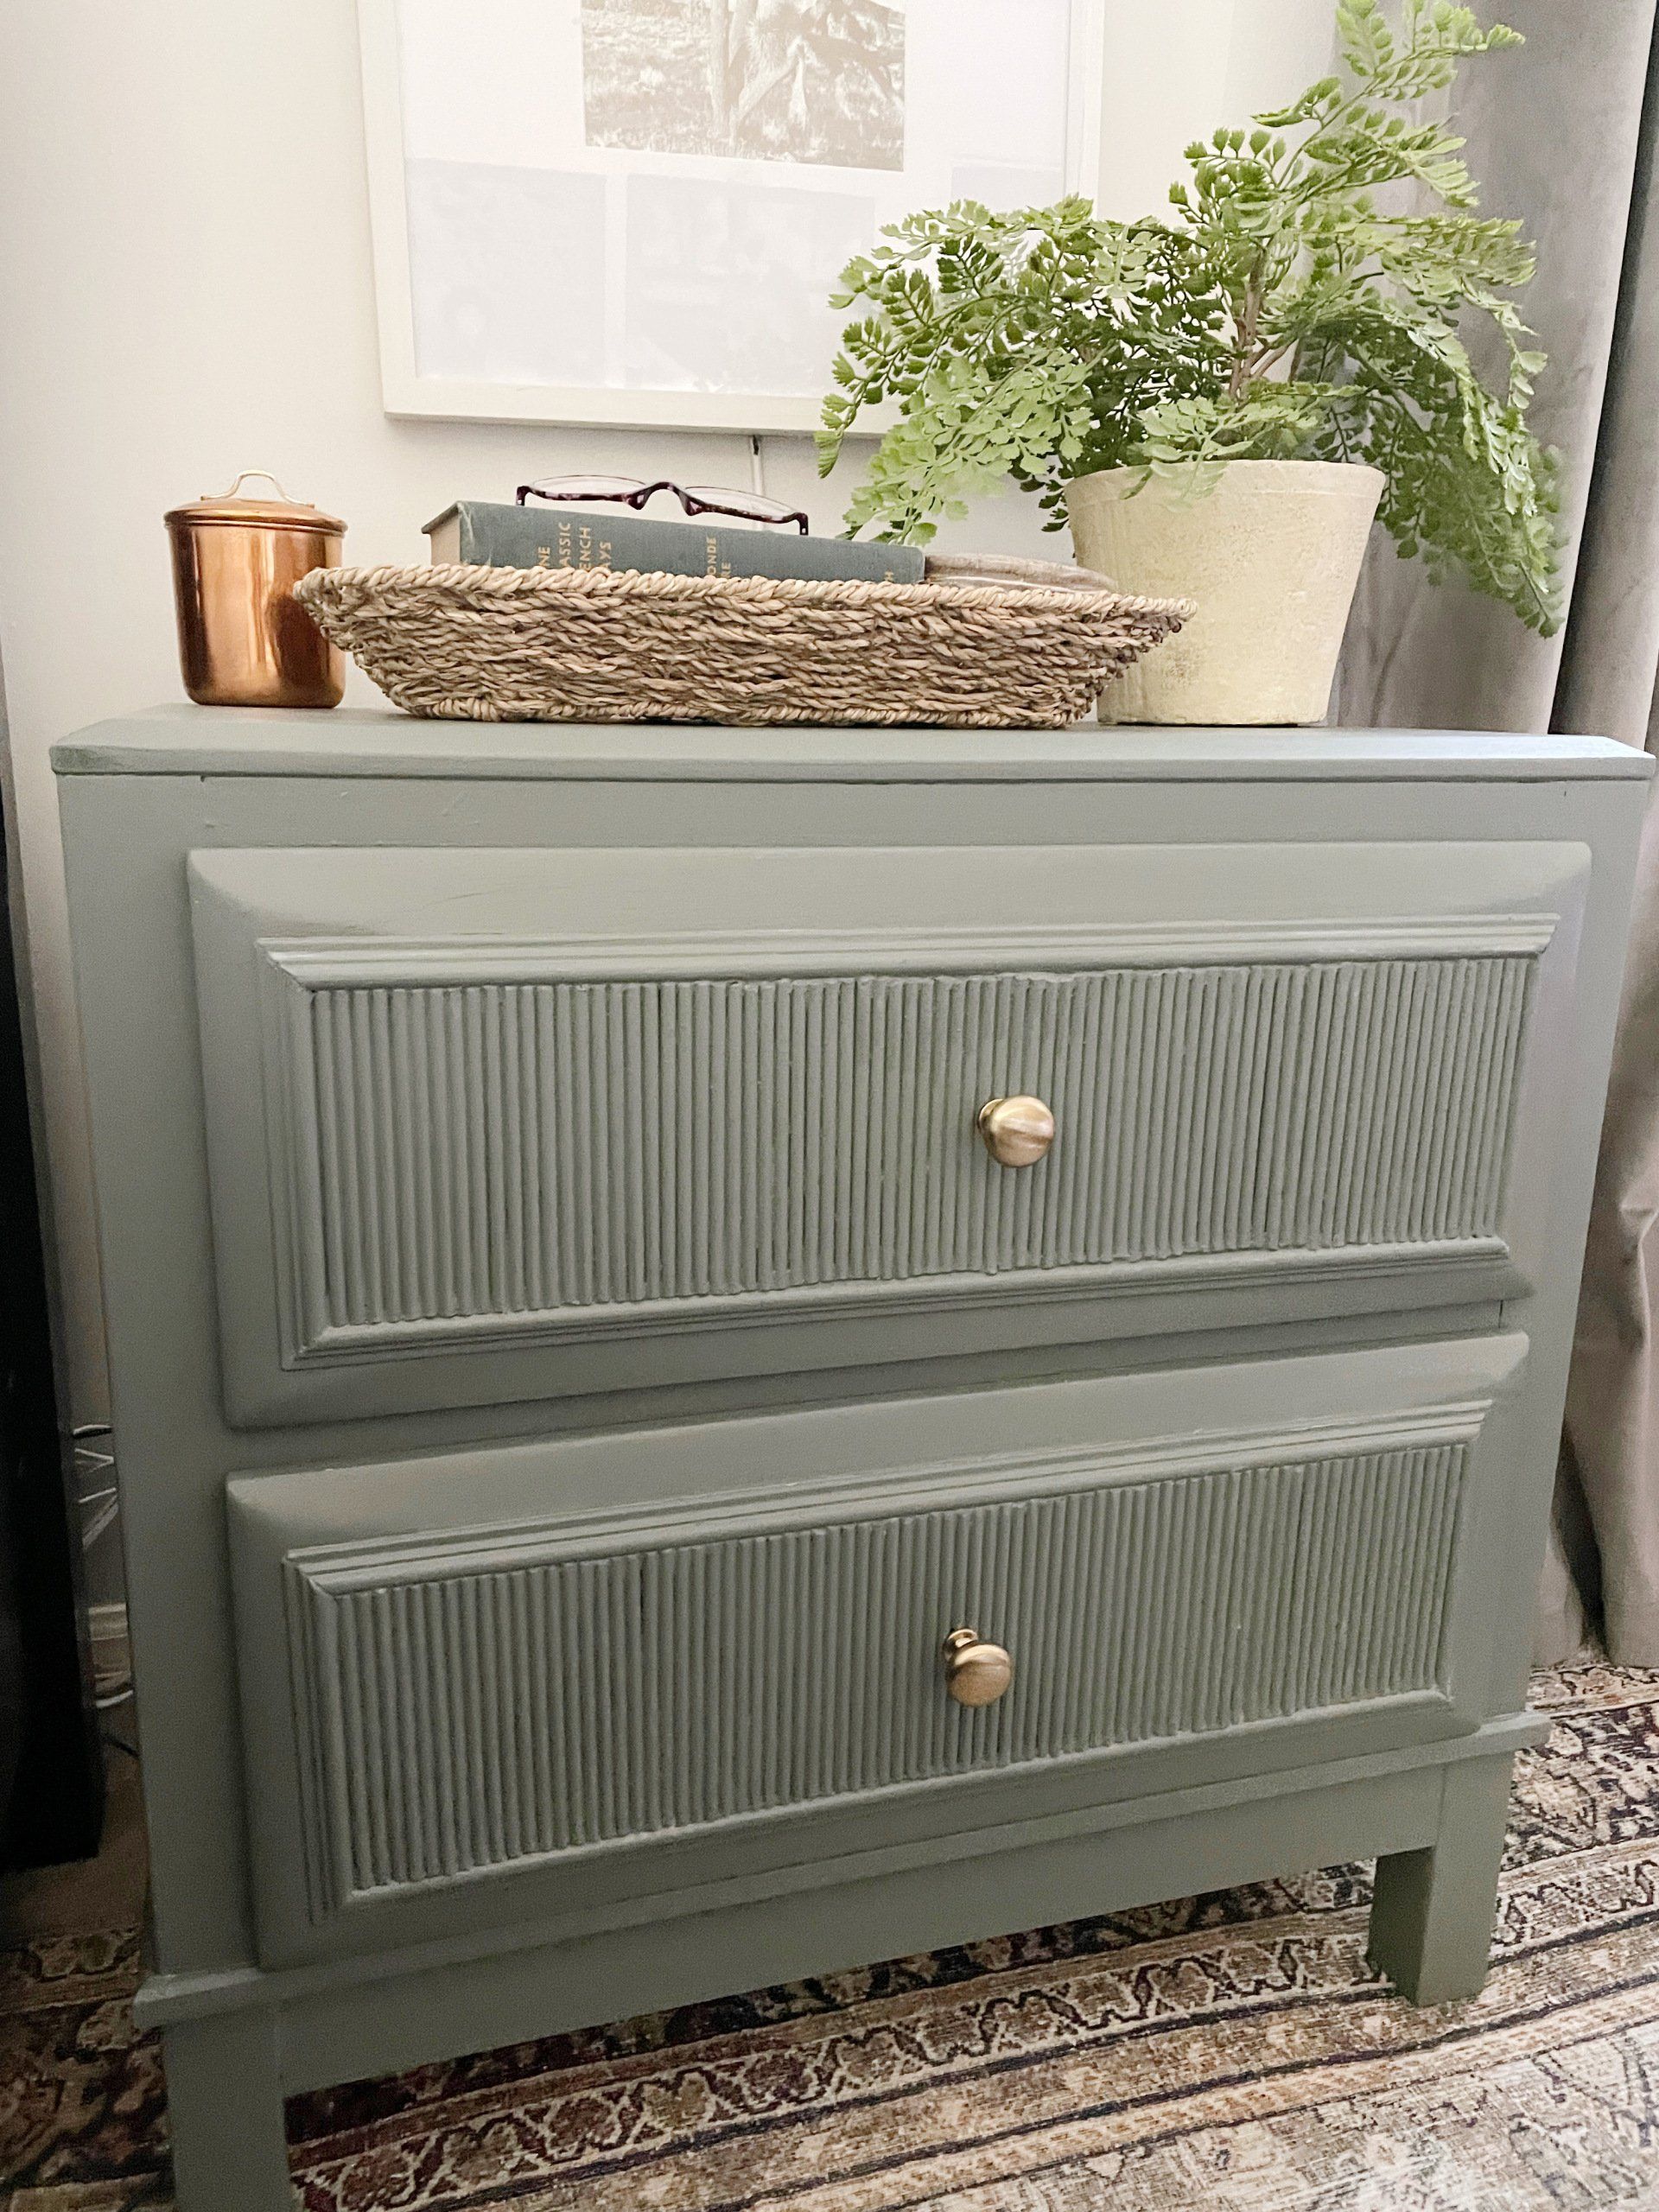
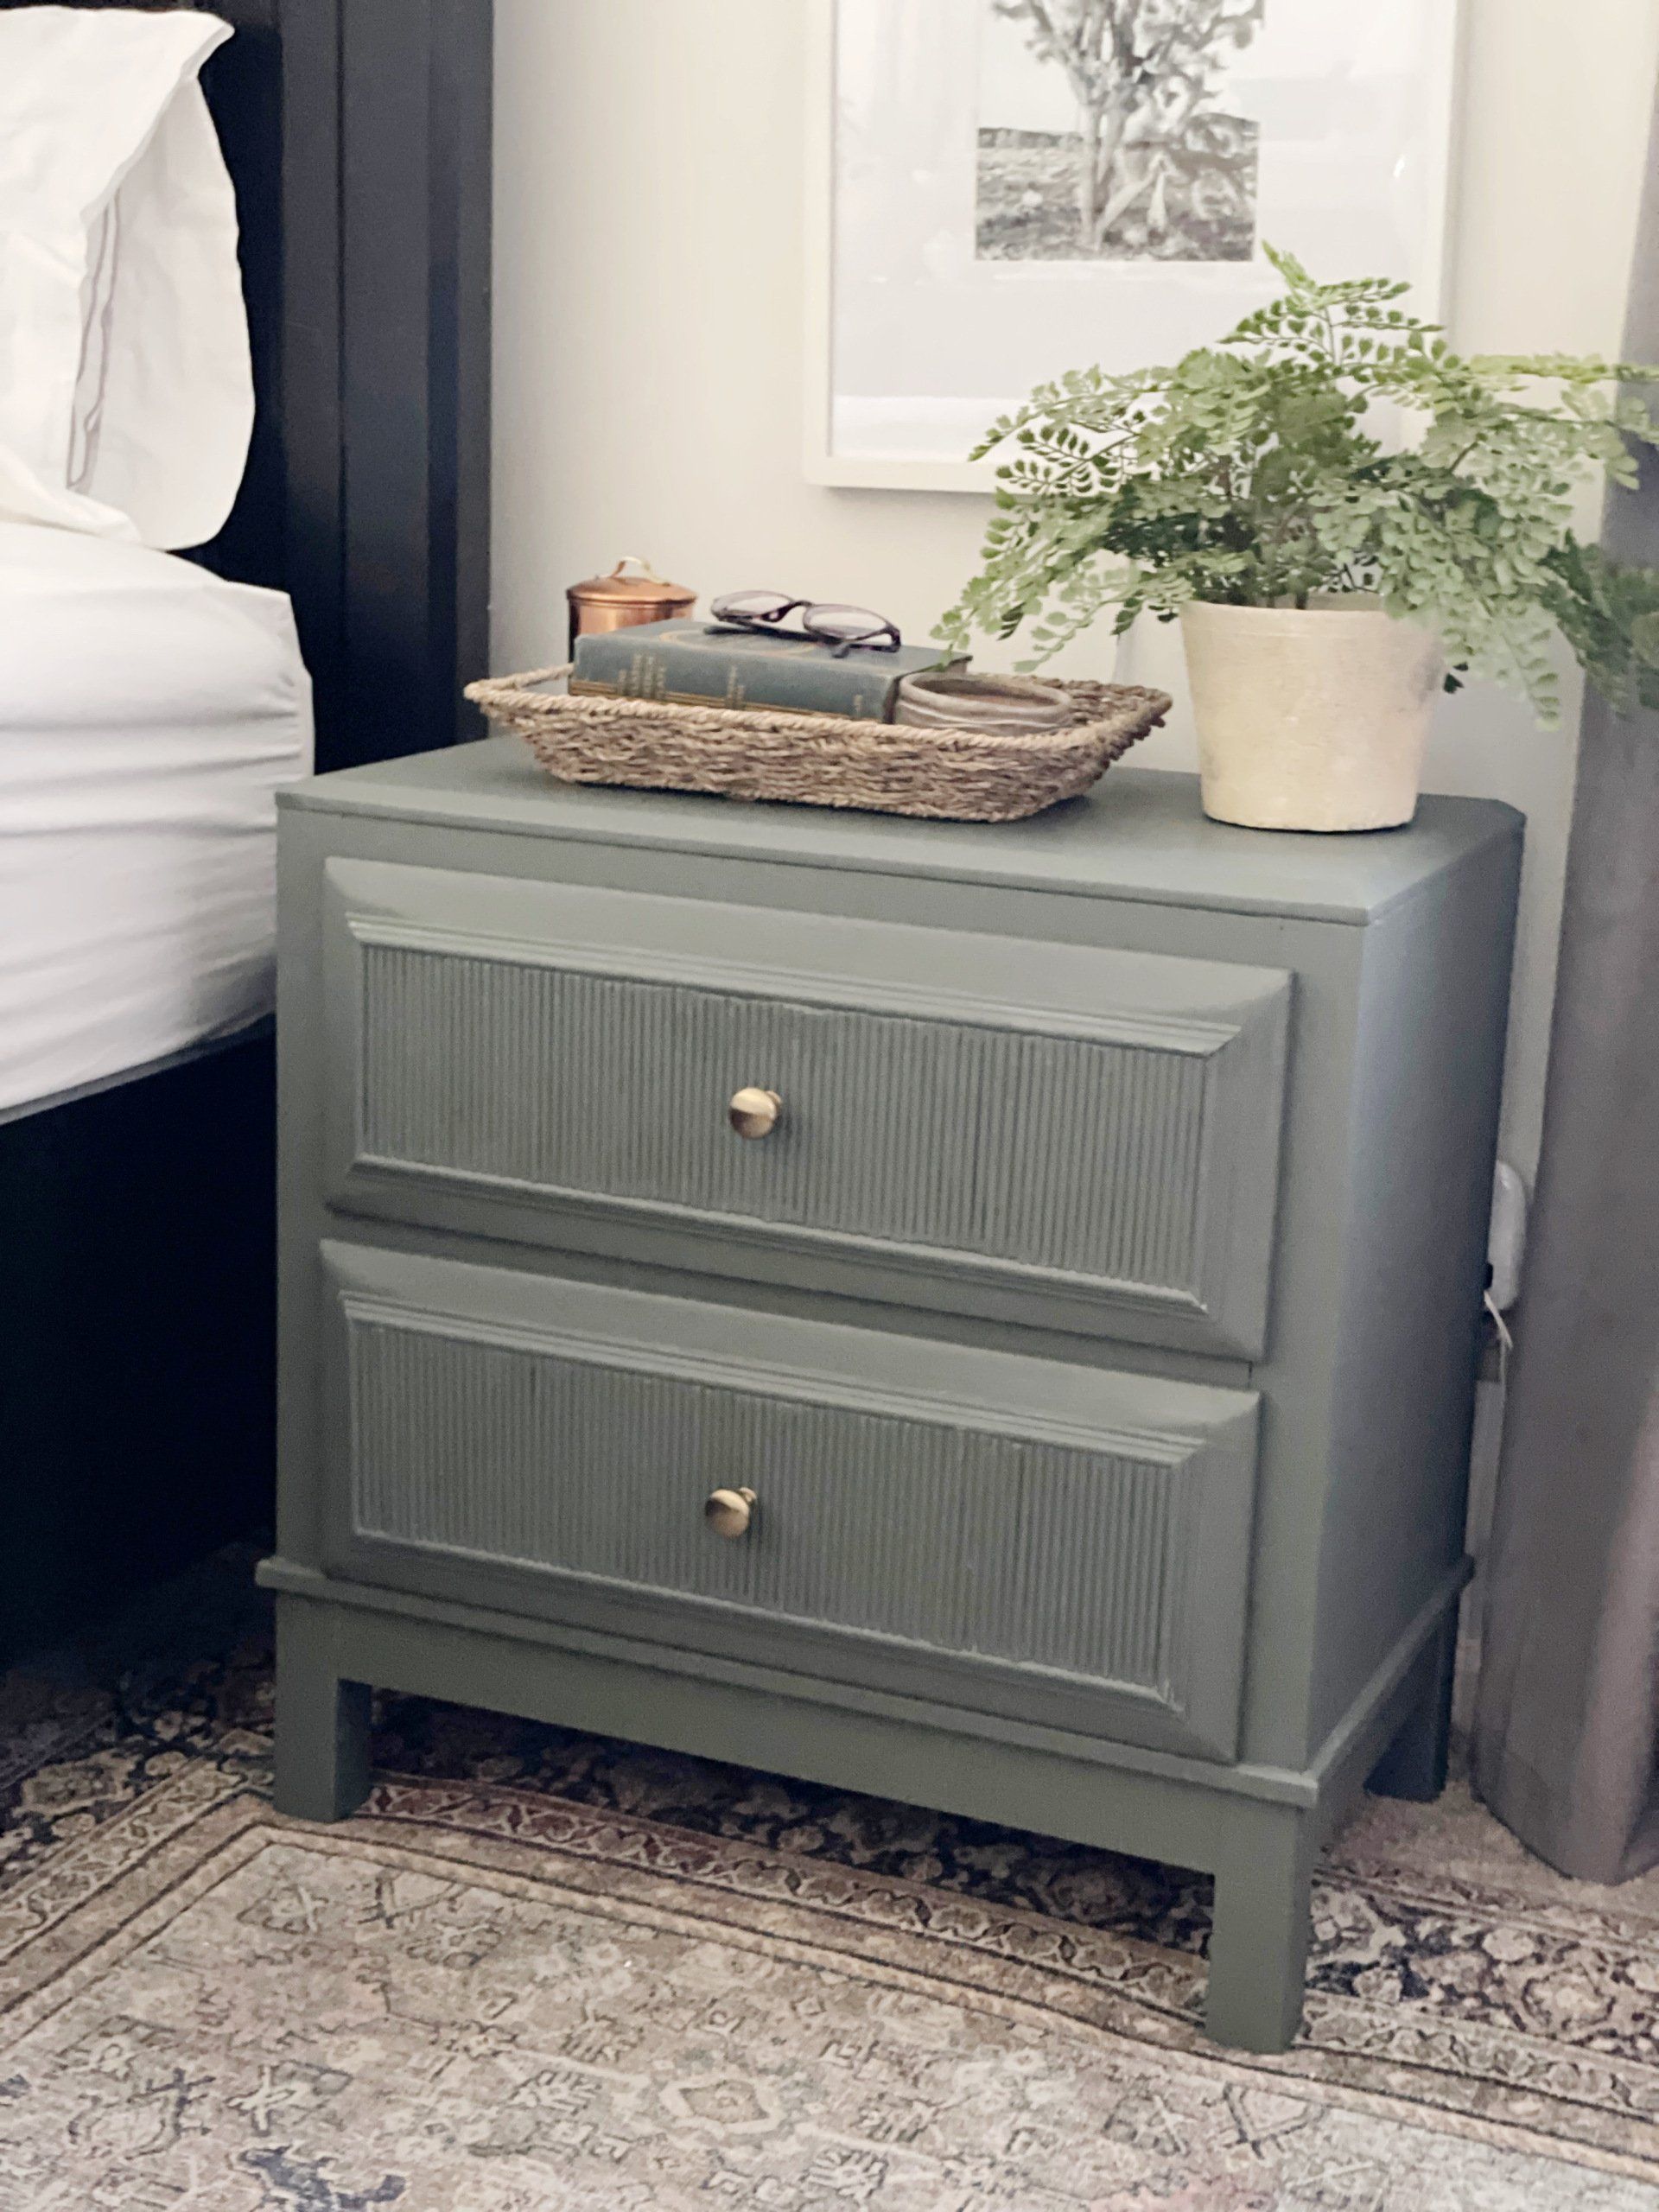
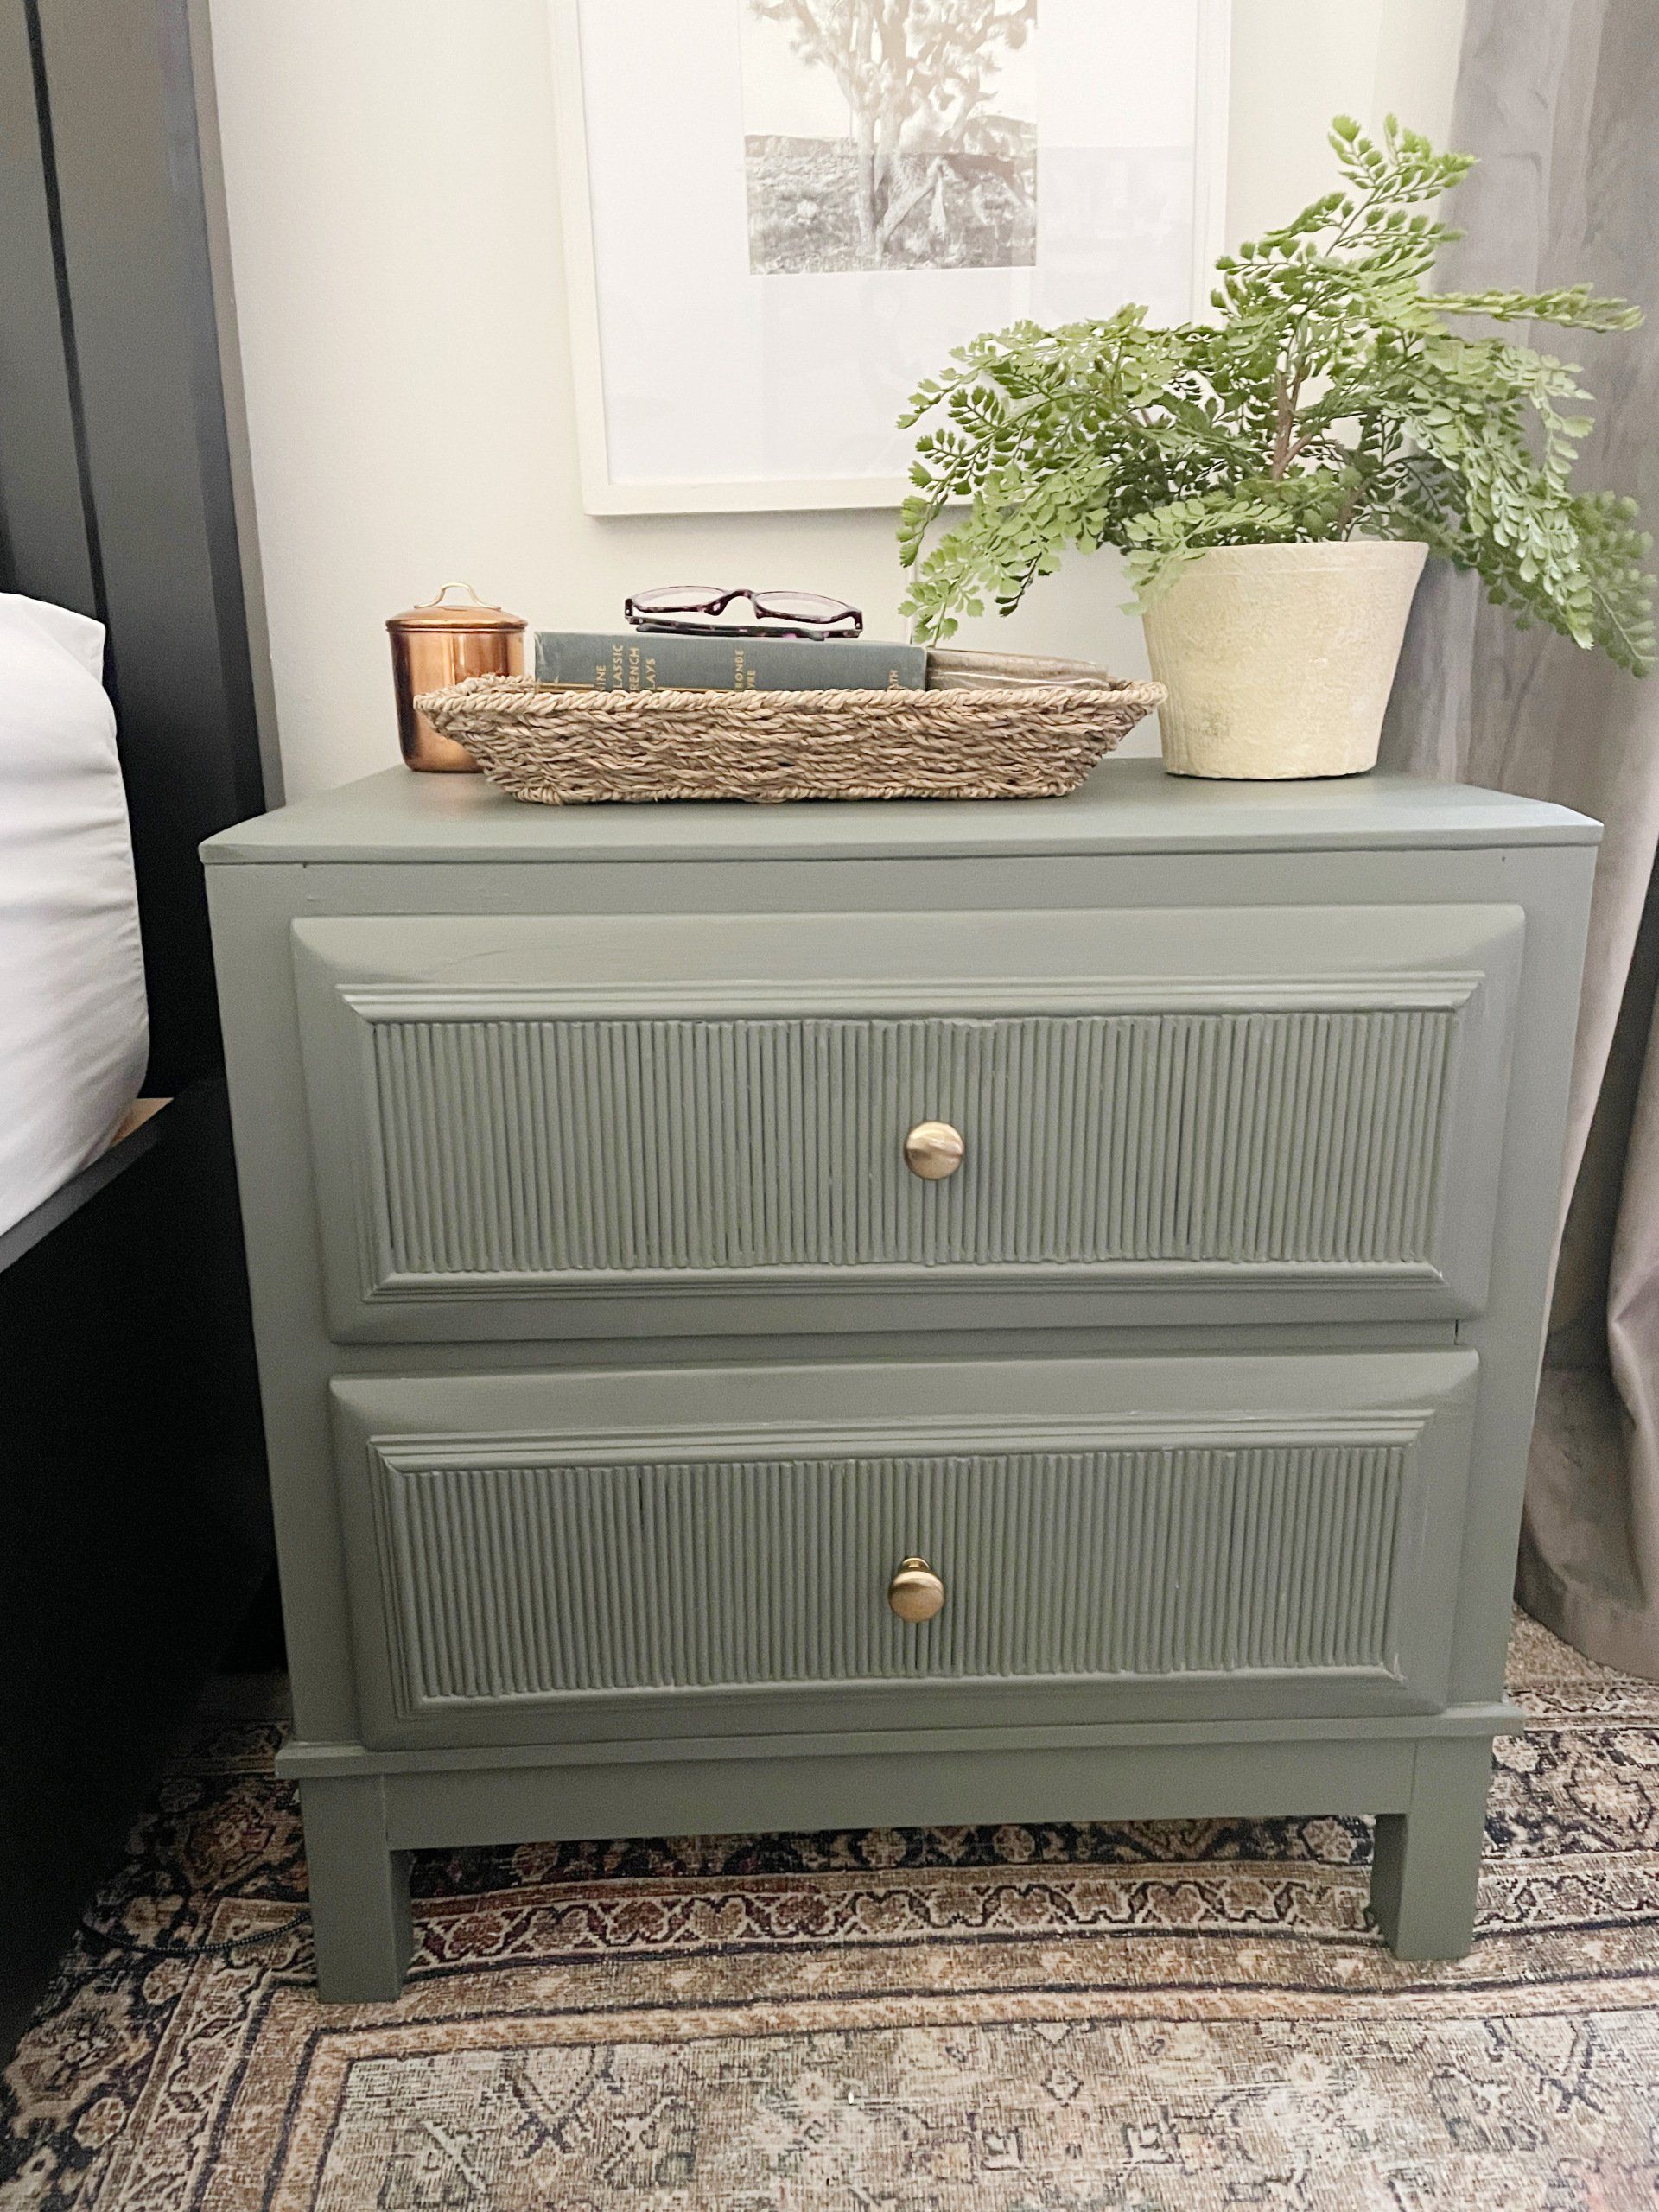
Fluted Nightstand DIY

Oct 13, 2022
My DIY fluted nightstand

Fluted Wood Furniture

I can't remember the first example of fluted wood furniture I saw, but it was probably either this gorgeous custom wood bathroom vanity from Chris Loves Julia, or the DIY fluted coffee table Fariha shared on Pennies for a Fortune.  The custom cabinetry was done professionally using a router for each line, which isn't something I possess the skills to do.  This did help inspire the colors I used in our bathroom remodel, though!  I really connected to the method Fariha used to build the coffee table--wooden dowels.  What a fabulous idea!
chris loves julia stained fluted wood bathroom vanity with marble
Pennies for a fortune diy fluted coffee table

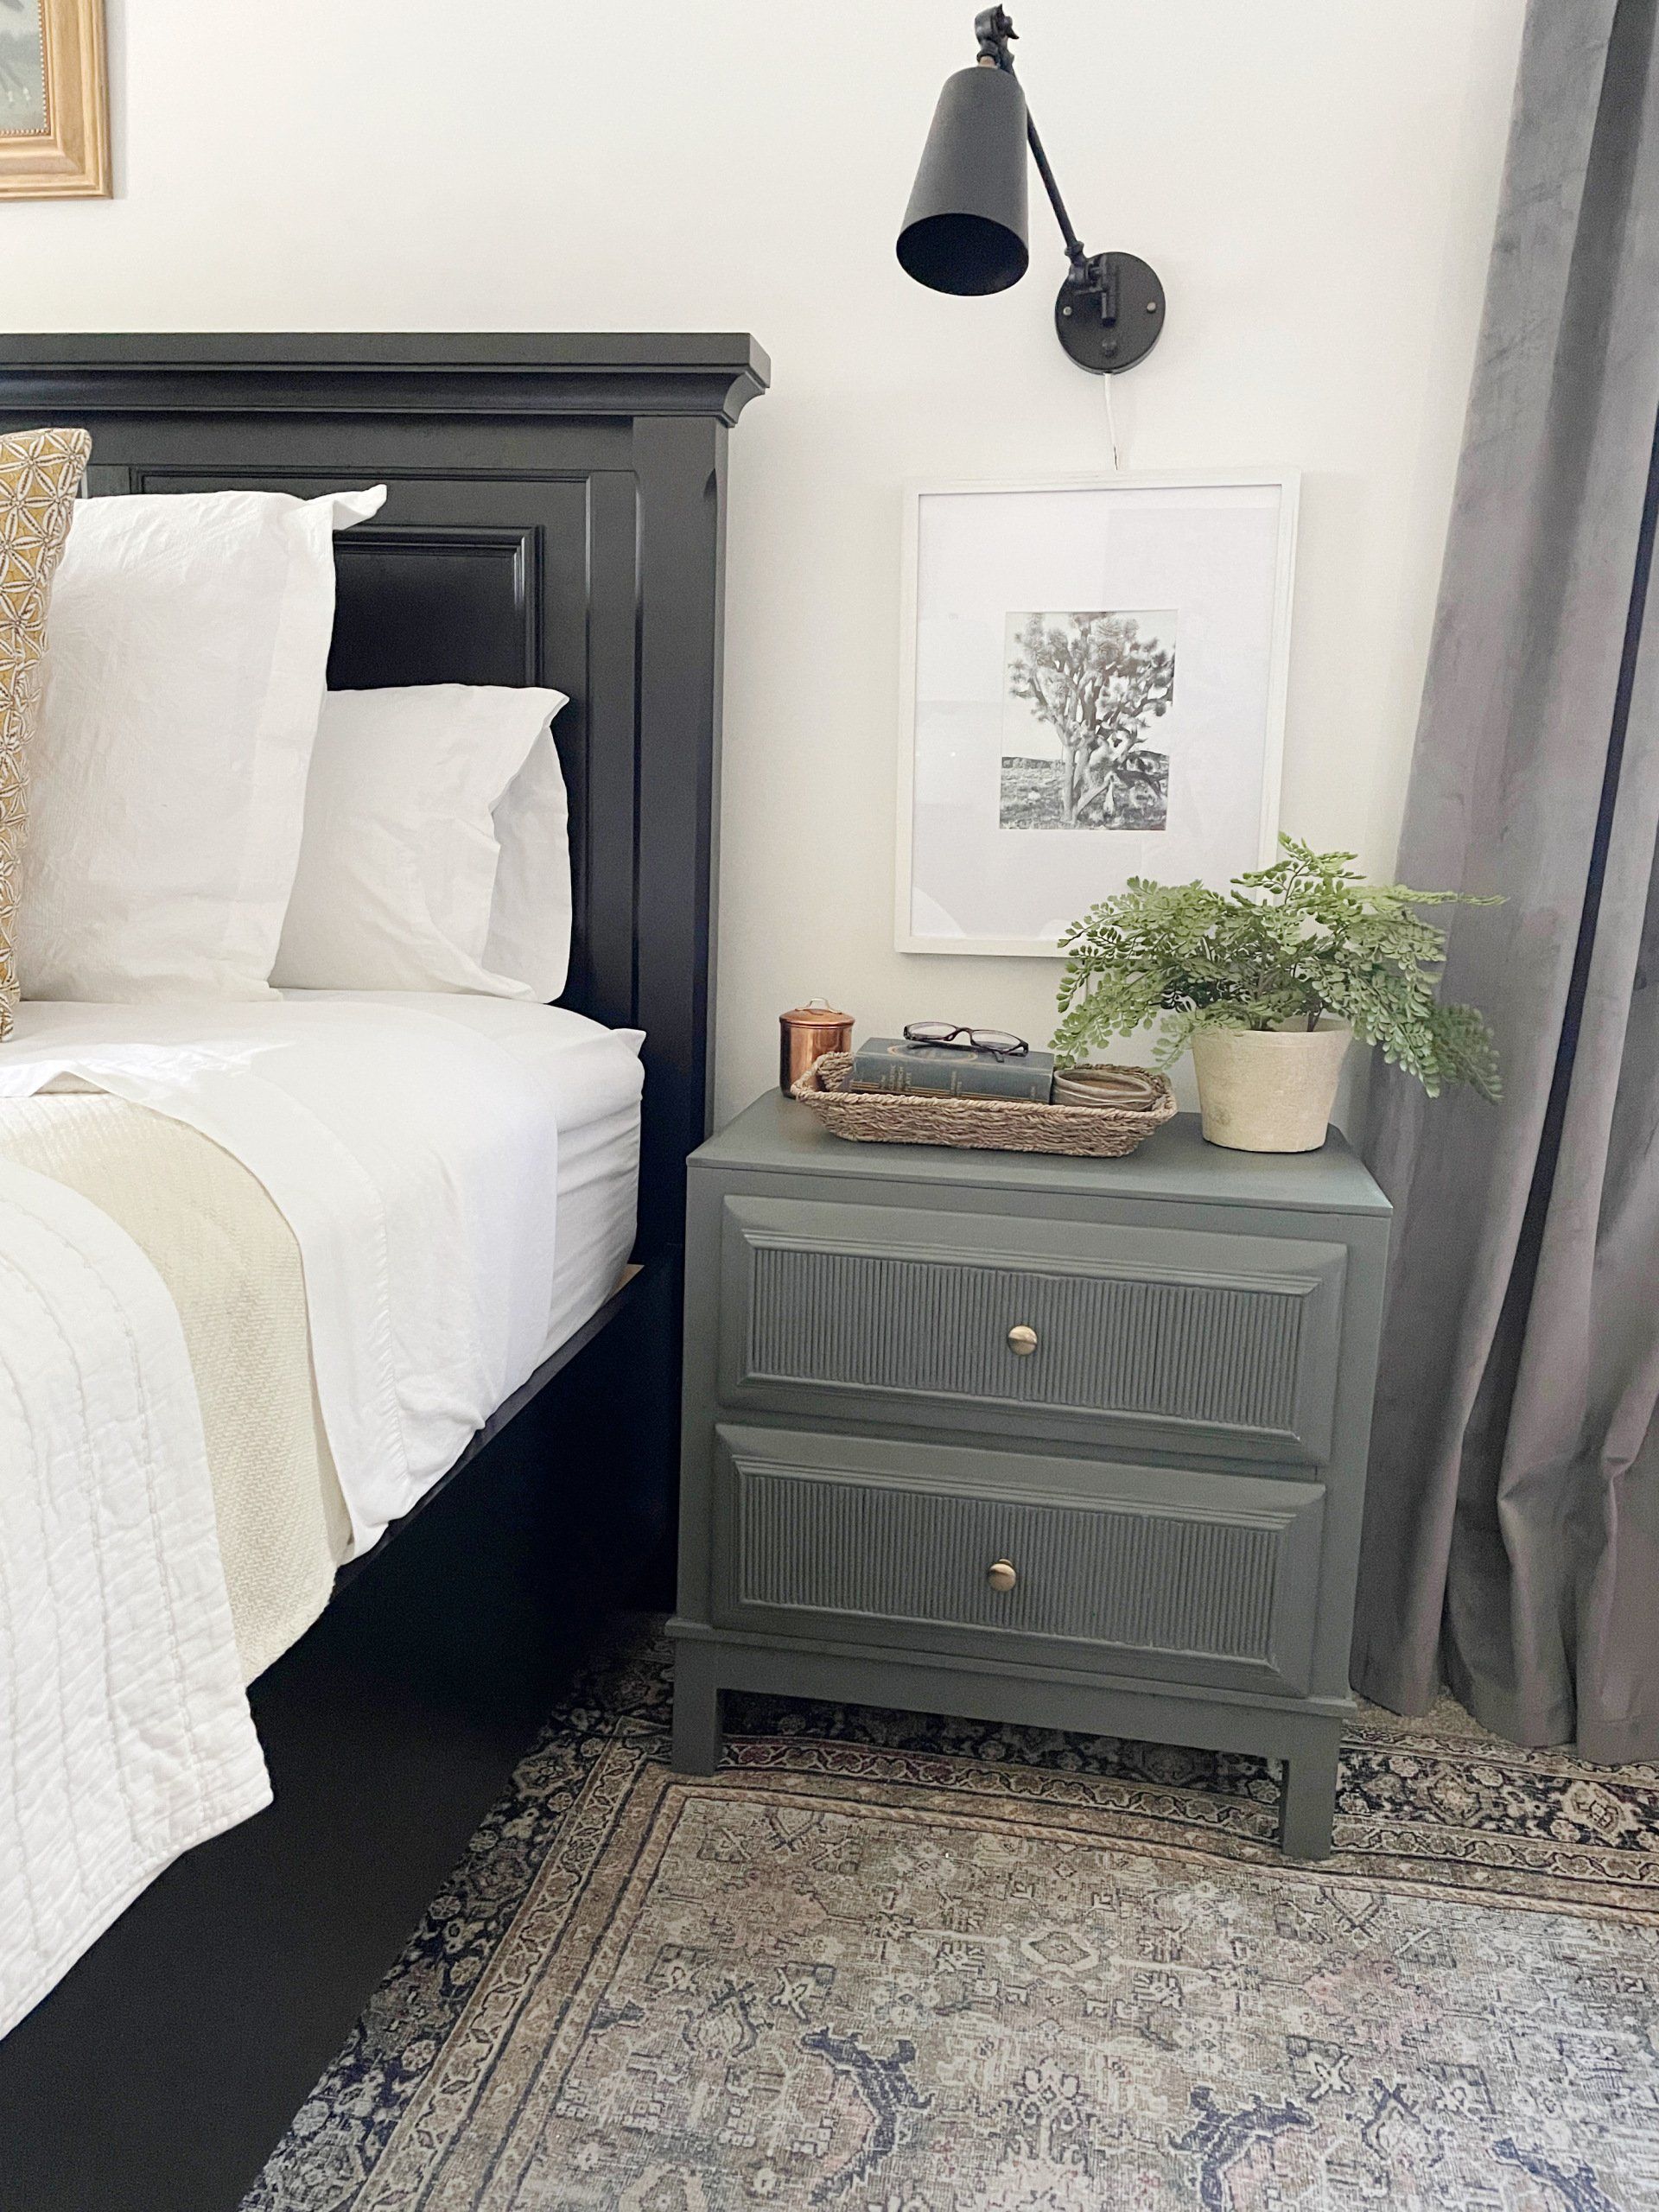
Nightstand Makeover Makeover
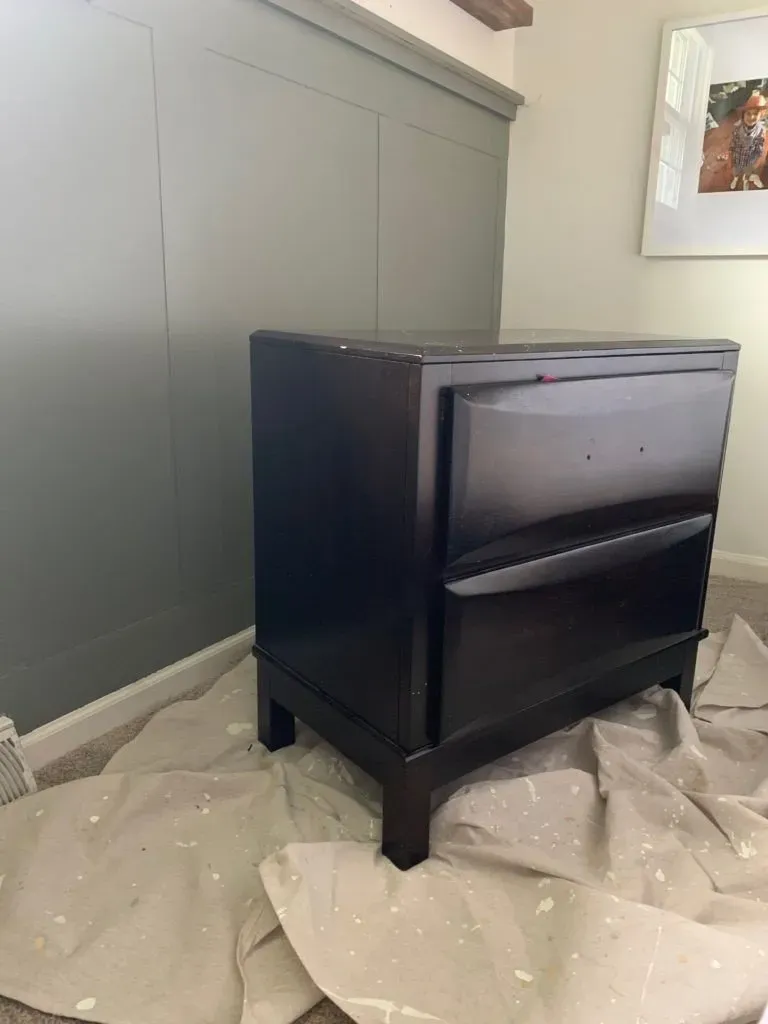
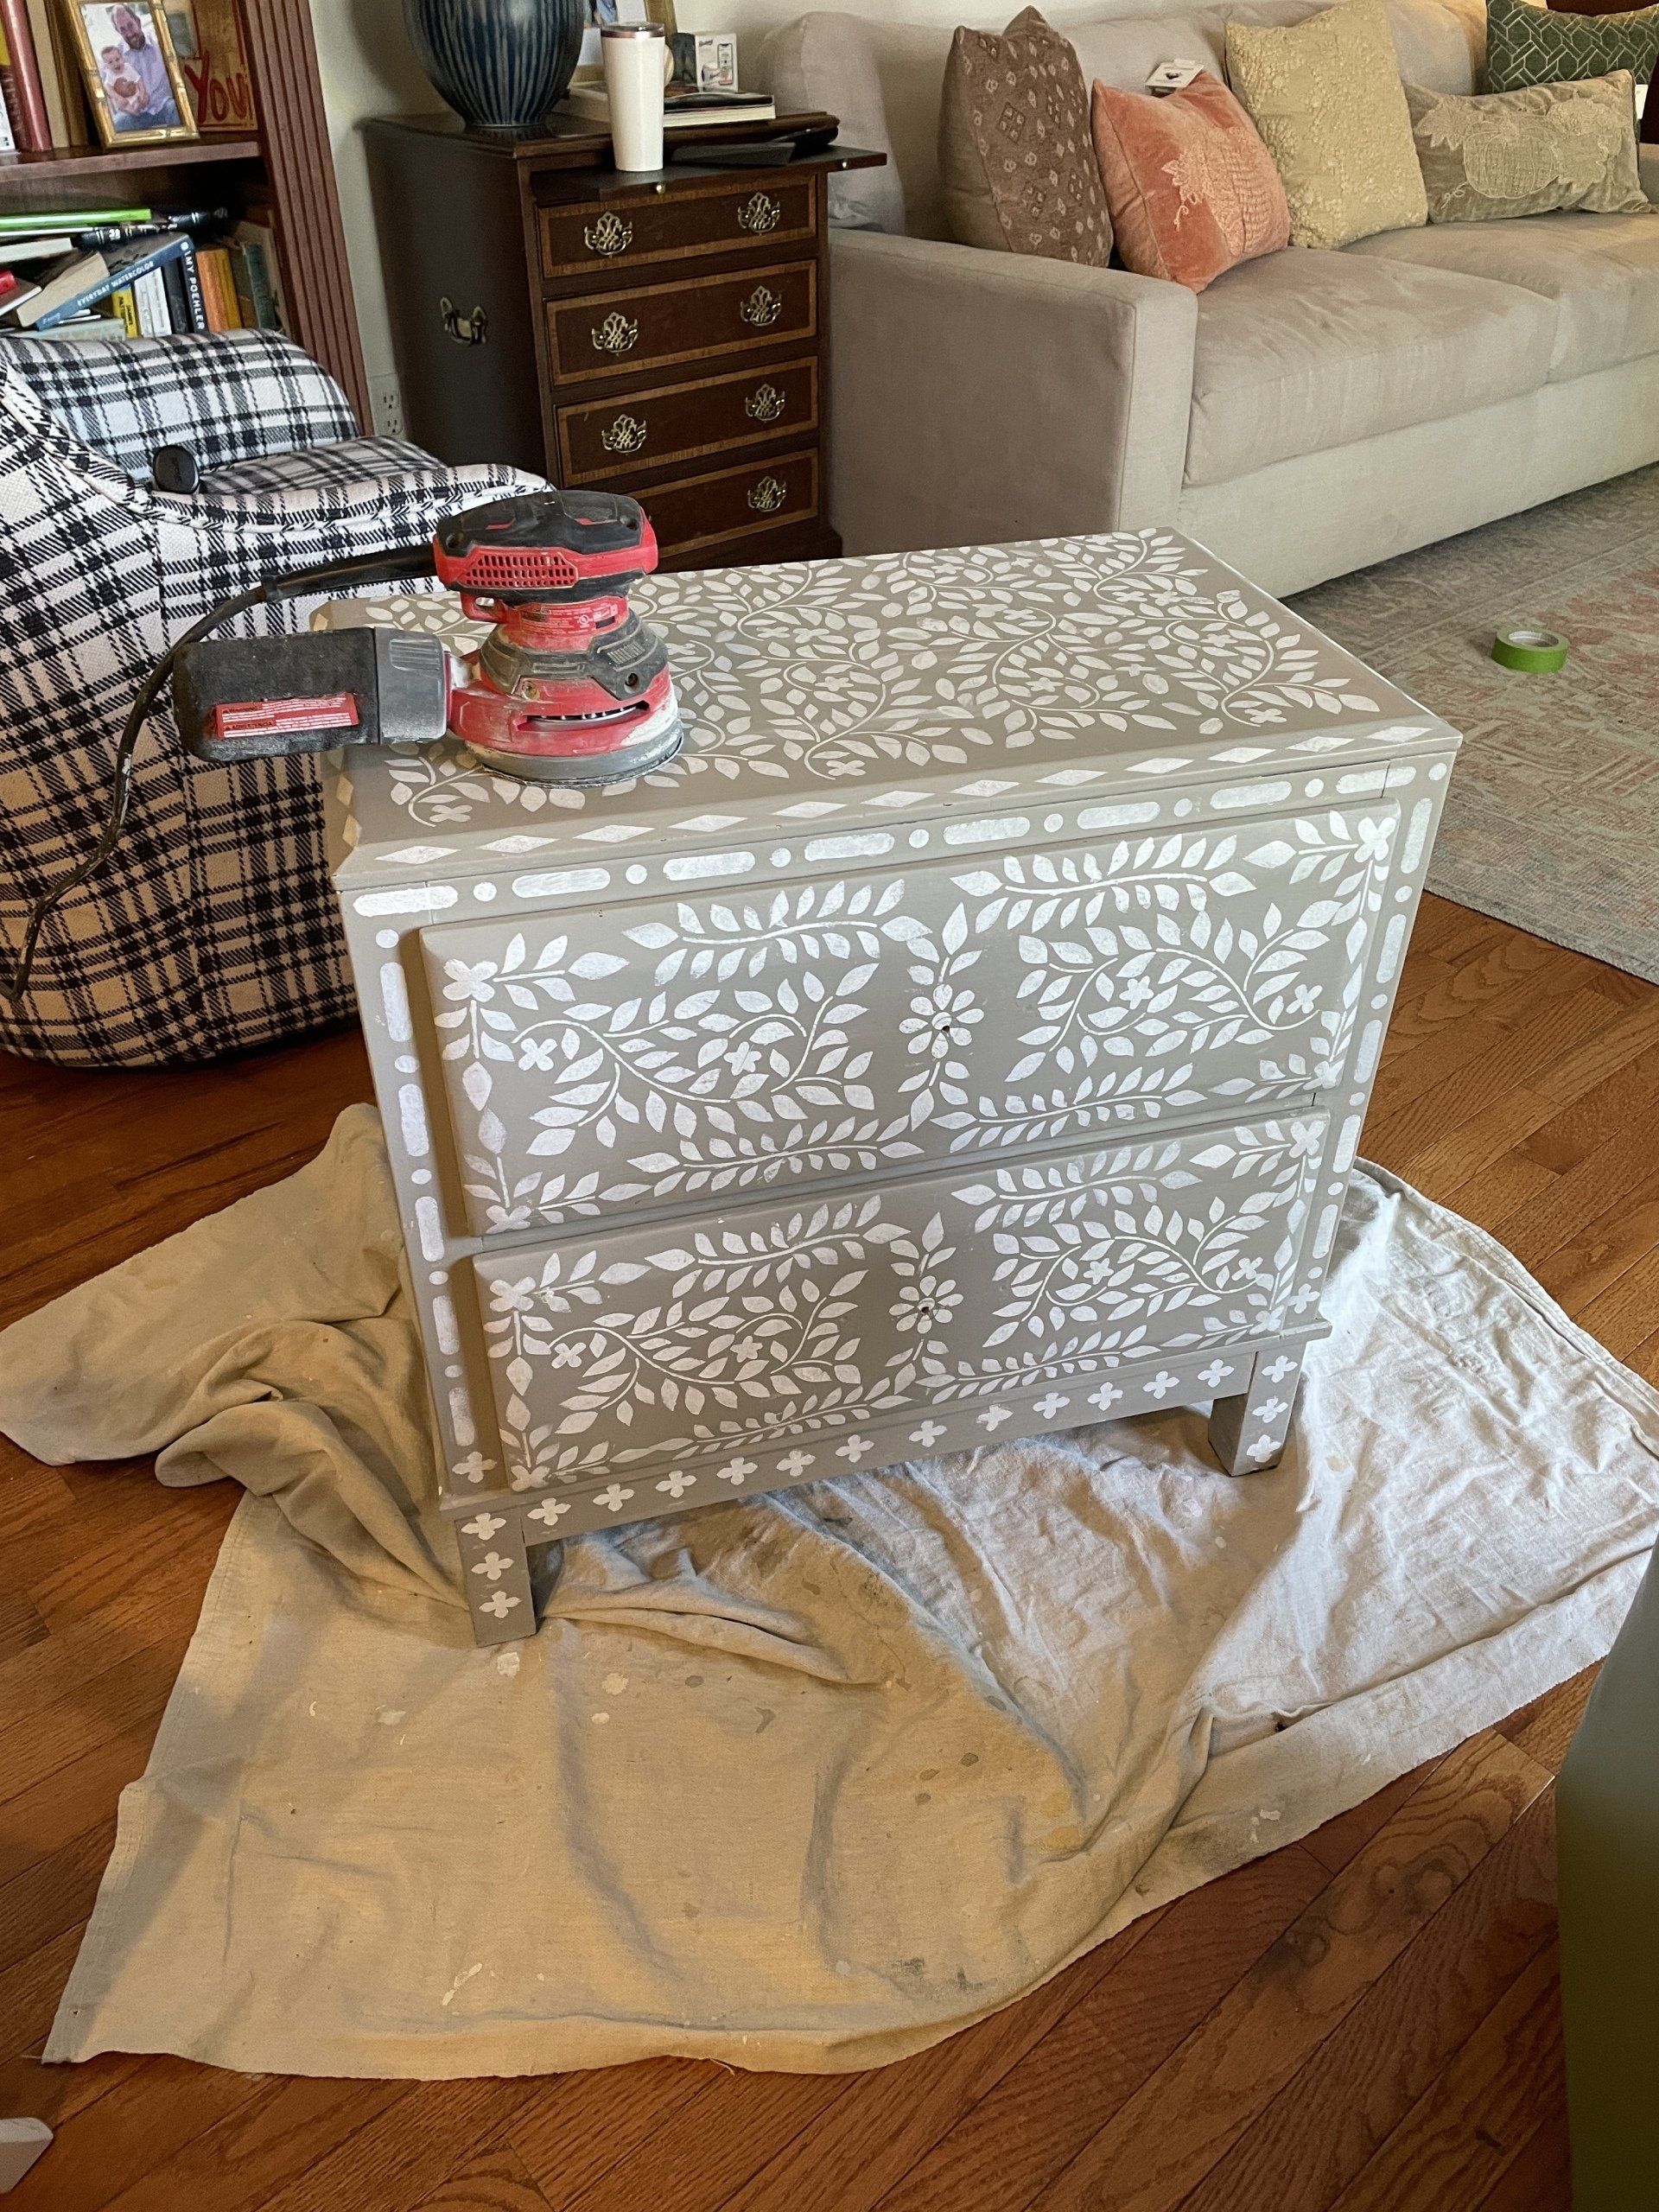
I actually already made over this nightstand before.  It started as my husband's old Ashley nightstand, and I never cared for the lines or hardware, so I changed it!  I transformed it into a faux bone inlay chest, but it hit me recently that it would be the perfect piece to try out adding fluted drawers.
Original Ashley Nightstand
DIY bone inlay nightstand

Prep

Ugh--I really hate prep work, but it sure does make a difference in the final result, so here I am sanding the surface a little bit with my electric sander.  It took all of 5 minutes and took some of the texture off, along with the sheen from the varnish.  The paint went on much smoother because of this simple step.
gray and white bone inlay stencil painted nightstand chest

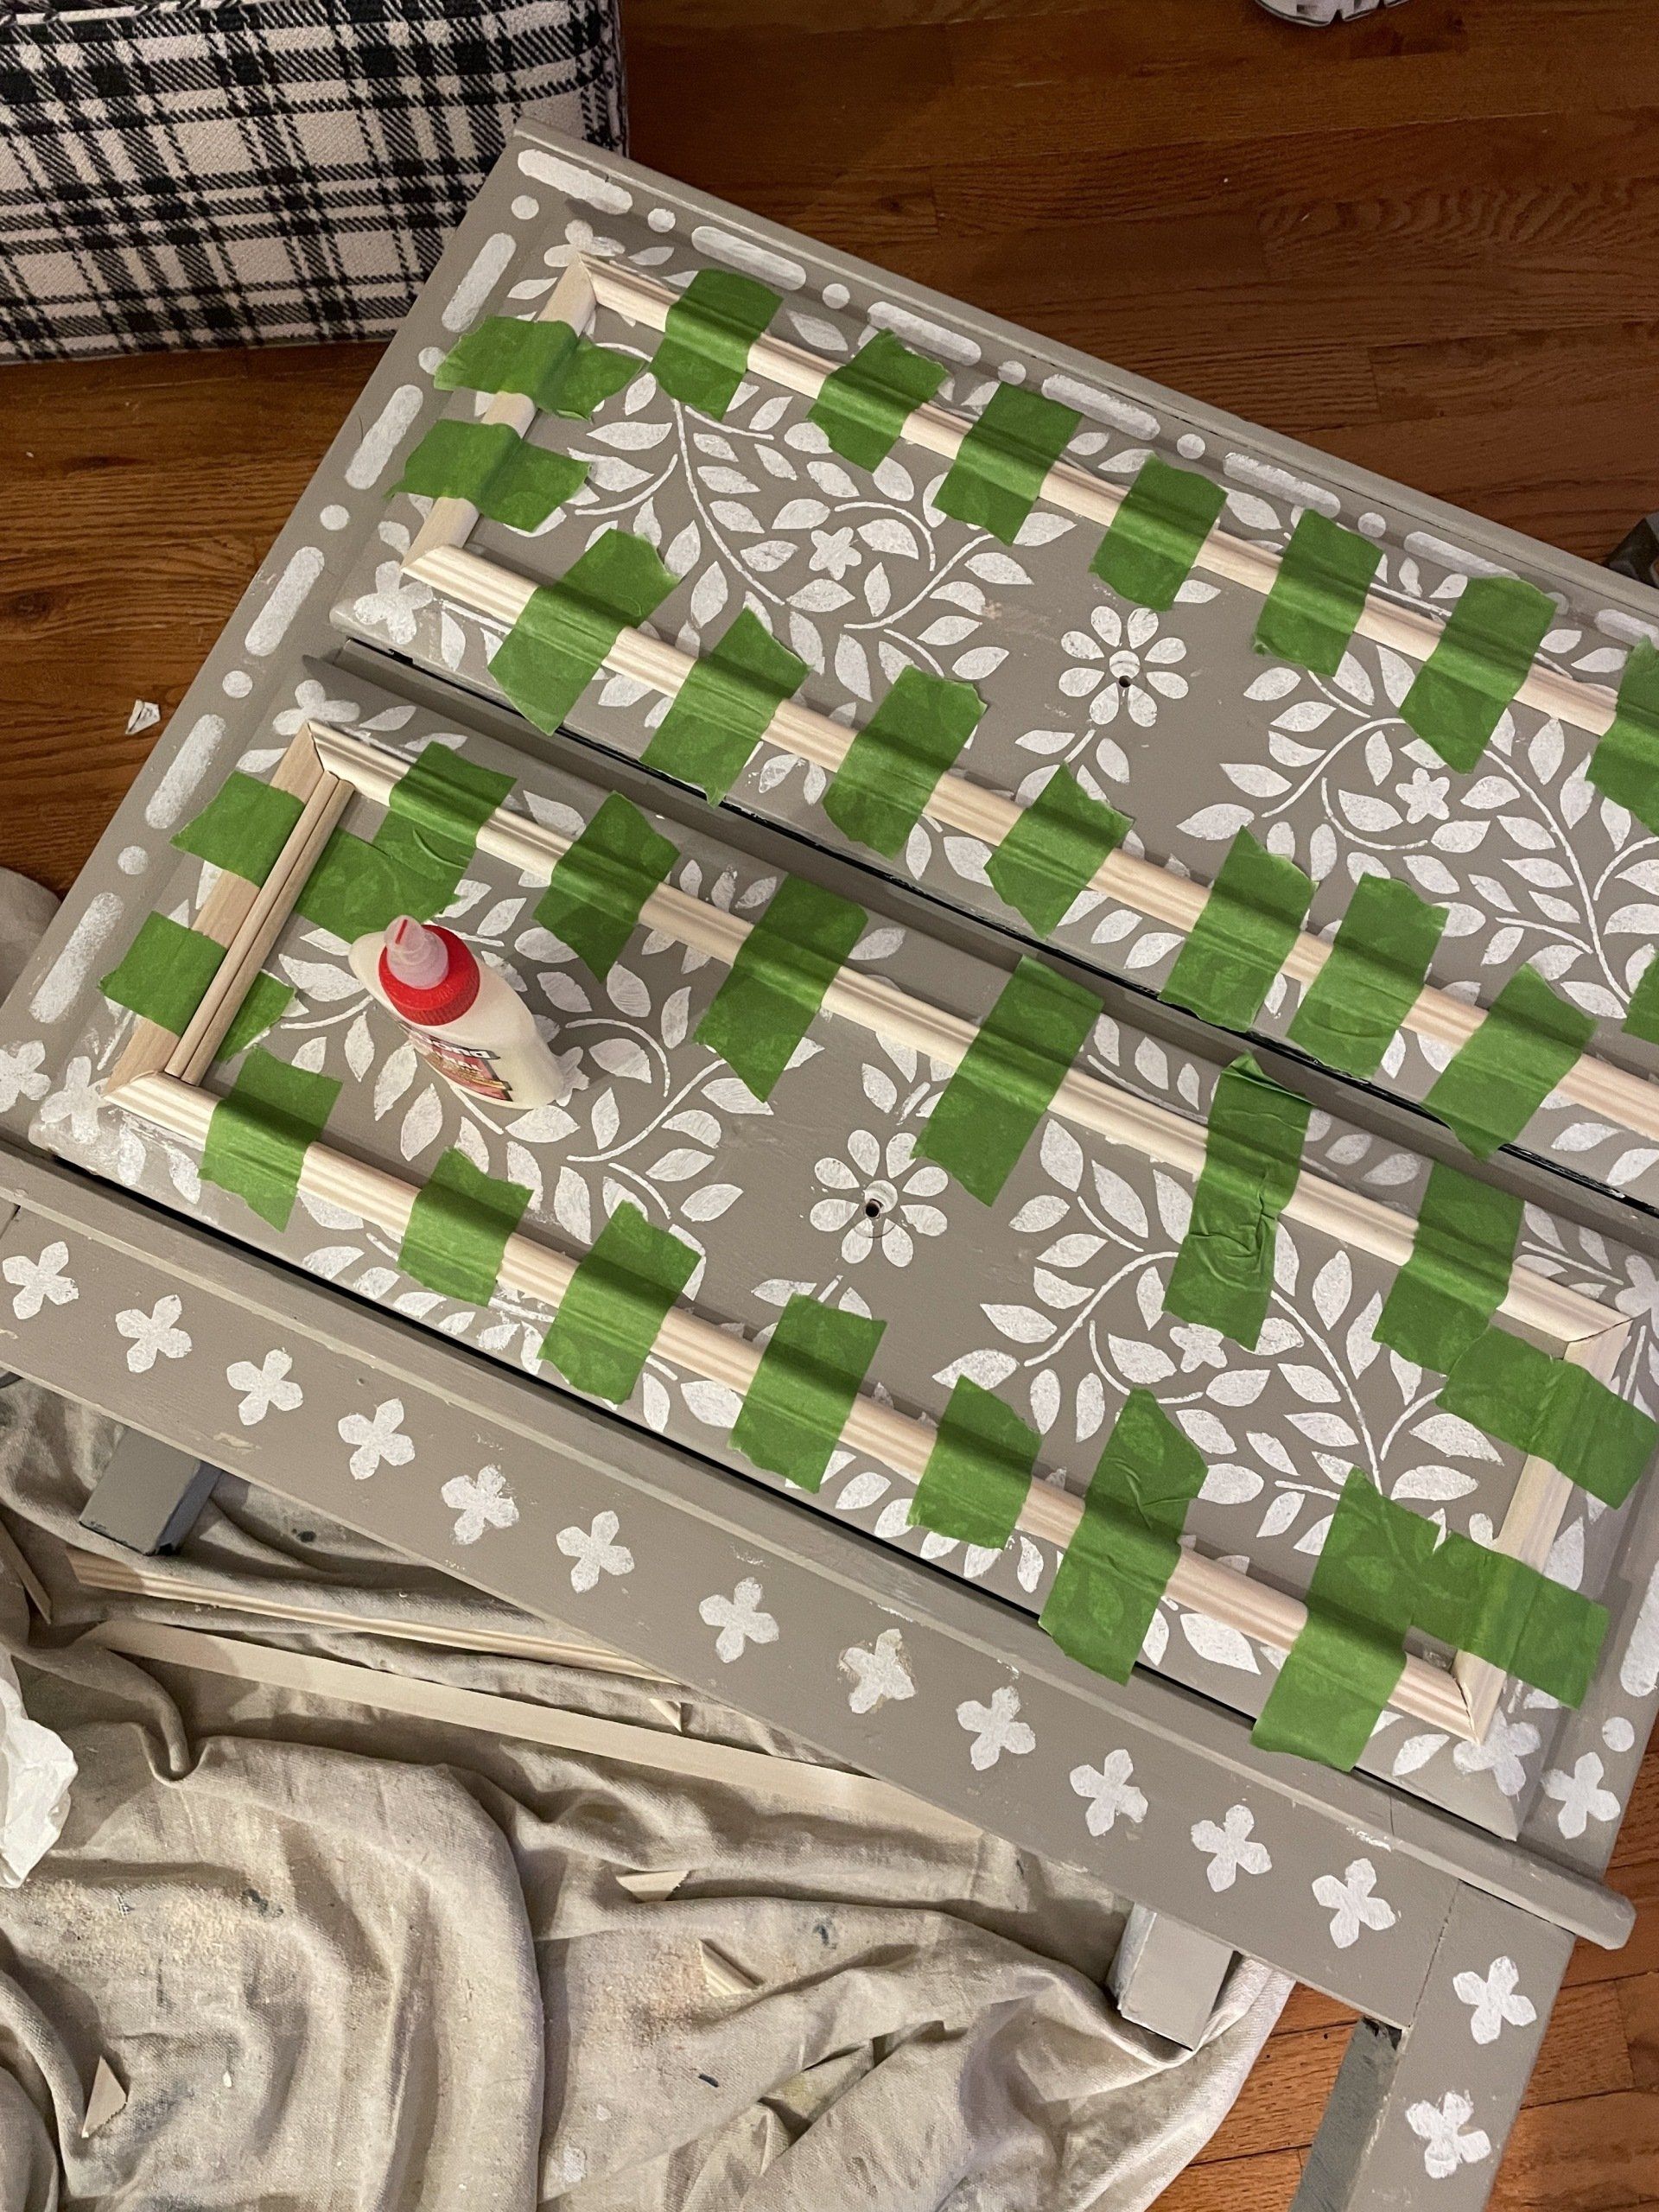
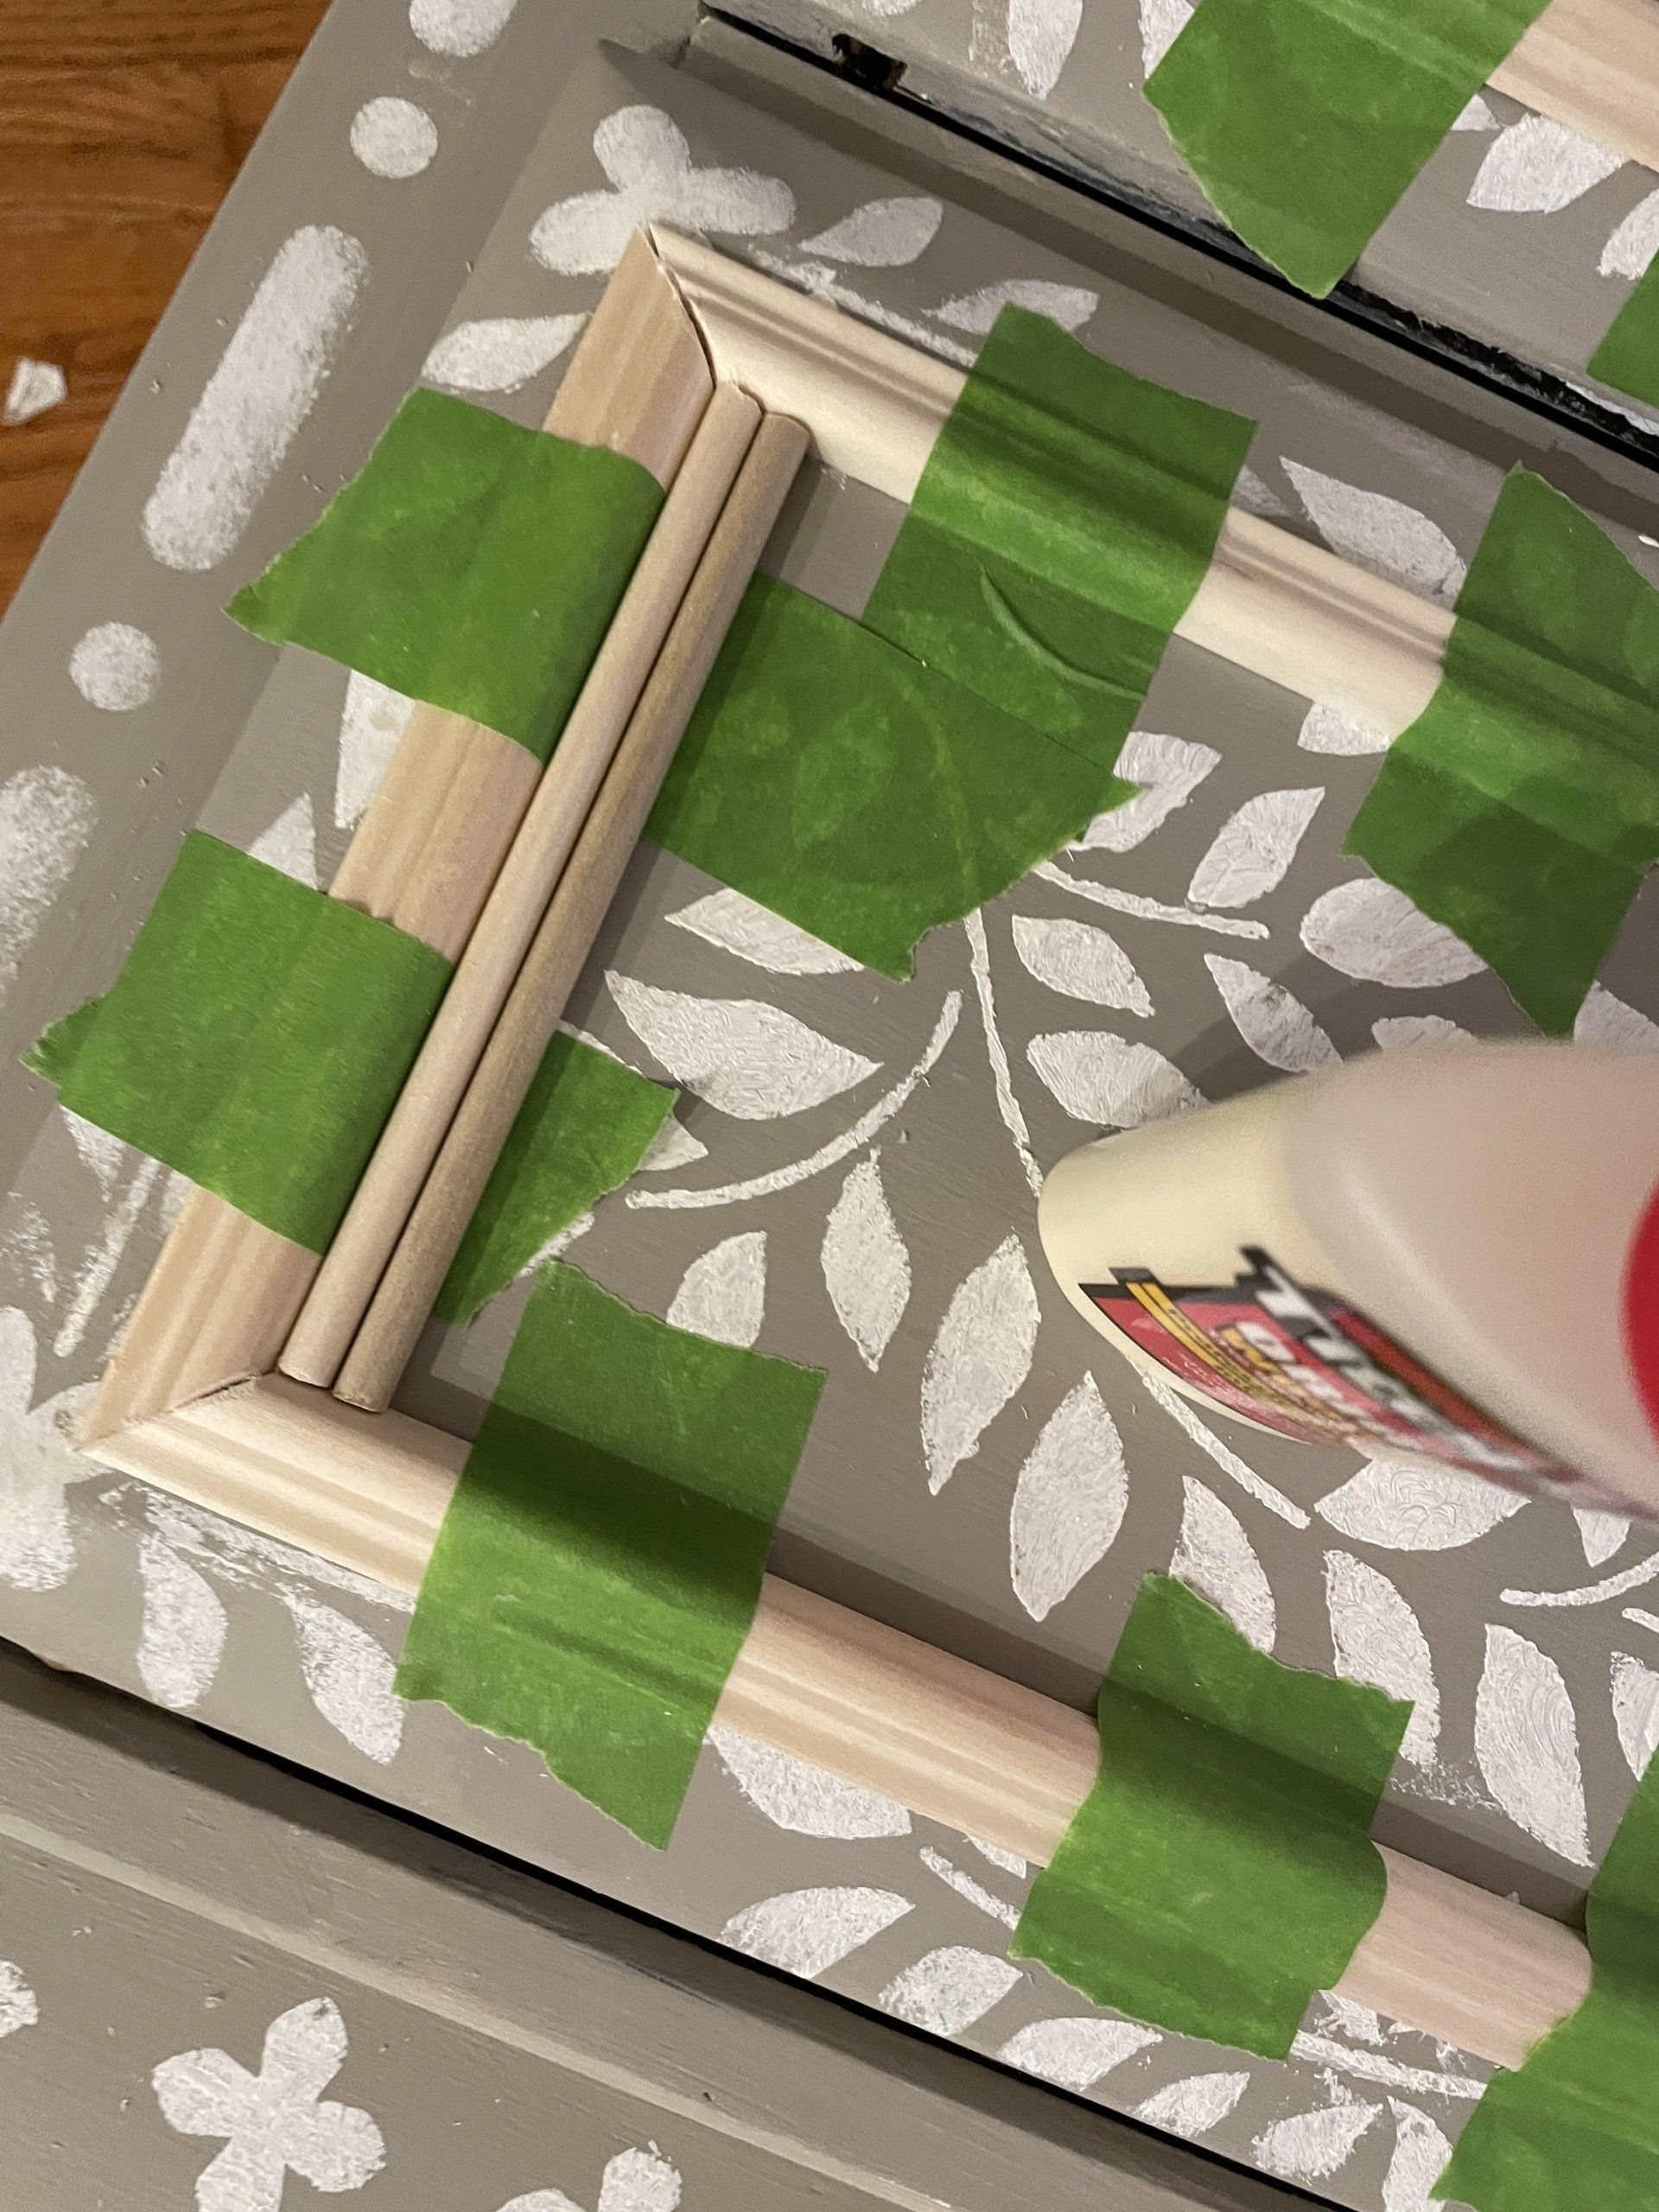
Since the drawers on this were beveled on every edge, I had to use some sort of moulding to create a "box" for my fluting aka dowels to set against.  Many of the examples I saw of these types of drawers/furniture were flat front drawers, so it took some brainstorming to figure out how to make it work.  I got a piece of ornamental moulding from a big box hardware store and used my mitre box and saw to cut it to the correct lengths.  I created "boxes" or "frames" with the chunky side of the moulding on the interior, so the dowels wouldn't be higher than the trim.


I actually made a lot of mistakes during this part.  Measure twice, cut once, anyone?  Well, angles give me fits and I kept cutting the wrong direction, so I wasted quite a bit.  I ended up using two pieces of 8' moulding for these two drawers.  I still wonder if I could've gotten by with one.  I used wood glue to attach, carefully fitting each together in the corners.  I taped it down well with painter's tape and left it to dry for a couple hours.

creating moulding on flat drawer fronts

Once everything was secure and dry, I measured the distance between the moulding and cut the dowels to length.  Again, I used a hand saw, and cut them together in bunches by taping them in a row.  An extra set of hands makes this go much faster.  I did sand the cut ends so they were neat--or, if I cut them a *little* too long and needed to shave off a bit.  I attached each with wood glue and let them dry.


After the glue dried, I caulked any gaps in the moulding, along with gaps at the top and bottom of the dowels.  I did have a couple gaps in between the dowels that needed a little caulk, but it totally camouflaged it once it was painted.

dowels to make diy fluted furniture

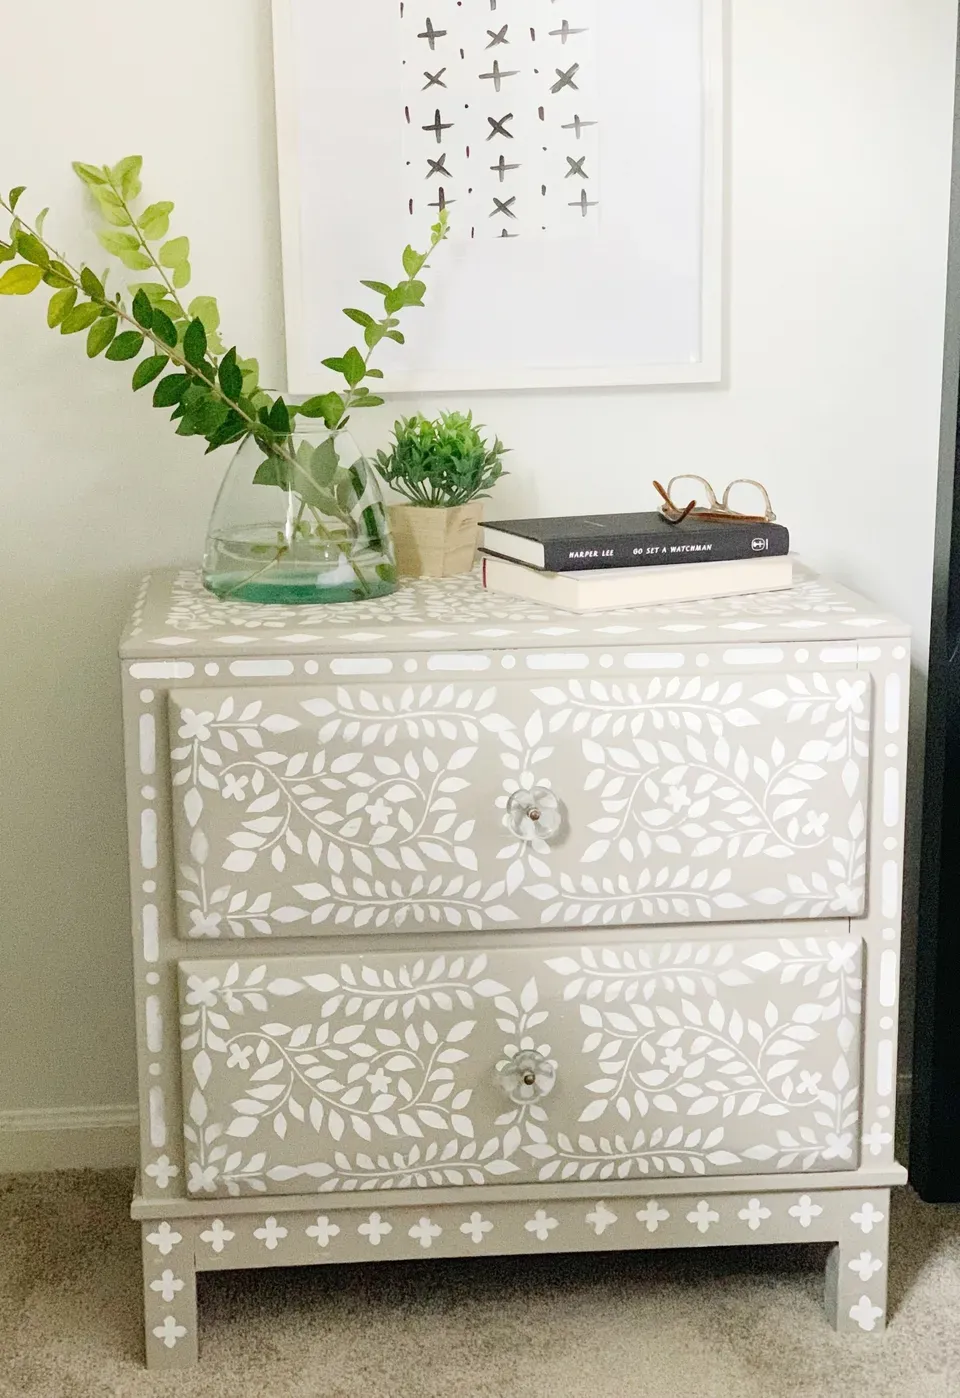
I painted it Sherwin Williams Woodland Lichen--a medium to dark green, and finished it off with a couple coats of my favorite varnish--Liquitex.  It got a pair of gold knobs, and I absolutely love how it turned out and I'm definitely going to keep this nightstand a little longer.  Who knows if it will change again?!

dark green fluted wood nightstand with gold knobs
diy green fluted nightstand with gold knobs
fluted drawers green nightstand with gold knobs
green with gold knobs fluted wood nightstand
By Jenni Jarvis 02 Feb, 2024
Designer Drapes
By Jenni Jarvis 24 Jan, 2024
Rug Roundup January 2024
By Jenni Jarvis 15 Jan, 2024
Booth at Christmas Market
By Jenni Jarvis 31 Aug, 2023
Grasscloth
09 May, 2023
What not to do
24 Jan, 2023
Romabio Velatura Mineralwash
14 Feb, 2022
I did a little refresh in our daughter's room, and I decided we needed some large-scale art. I actually planned to order a print, but inspiration struck on a trip to HomeGoods when I saw two HUGE framed canvases on clearance for $25 and $9. I grabbed them up and headed home, with my head filled with ideas on what to do with them.
14 Feb, 2022
I love peel-and-stick wallpaper so much! It's an easy, DIY fix for any space that just needs a little refresh. Because it's easily removeable, I feel much more confident going ahead and choosing a pattern. I struggle to commit to traditional pasted wallpaper--I think it's because we removed so much of it when we bought our house. It is no easy task. Peel-and-stick is also very economical, so if you decide to change it up a few years down the line, it doesn't feel so bad. I've now put it in four areas of our house. Today, you'll see the kitchen and den. It's the same pattern in different colors. I love how much the simple pattern really just makes each space.
By Jenni Jarvis 01 Oct, 2021
Just for fun, here's a freebie--a digital download for some fall wall art! This quote is from Anne of Green Gables. I still want to read the book, but I was a huge fan of the series Anne with an E on Netflix. Just click on the file, download it and print it at home or send it to a place like Office Depot. Happy October!
15 Sep, 2021
I switched some things around in the house, and needed a spot for one of my favorite rugs from the Chris Loves Julia x Loloi collection. The current laundry rug was getting a little worn and it was the perfect space for another 5x7 rug, so the Oriental Natural/Ocean Area Rug had a new home. The problem was, it wasn't really meshing well with the existing black and white palette in there, so I decided to nix the hand painted mudcloth accent wall . You can also see the before of the laundry room in the post.
More Posts
Share by: